�ͷ�����
�I����ԃ
���g֧��
�ھ��ͷ�

CentOS�bLAMP������(Apache2+PHP5+MySQL)
���ӕr�g��2011-11-22��
���ӣ�
admin��
����1.��Ҫ��ʾ��
�����ڱ��̳���ʹ�õ����C����server1.example.com��IP ��ַ�� 192.168.0.100 ���@Щ�O�Õ��c���w���b���O��������ͬ��������������İ��b�^�����M�������
����2.���bMySQL 5.0
�������_�K�ˣ�ݔ�룺
| yum install mysql mysql-server |
����Ȼ���MySQL����ϵ�y����朽�(�@����ϵ�y���ӕr��MySQL���Ԅӆ���)���ڽK��ݔ�����
| chkconfig --levels 235 mysqld on
/etc/init.d/mysqld start |
������MySQL root�����O���ܴa��
| ��mysql_secure_installation |
�����K���@ʾ��������ʾ����:
| [root@server1 ~]# mysql_secure_installation NOTE: RUNNING ALL PARTS OF THIS IS RECOMMENDED FOR ALL MySQL In order to log into MySQL to secure it, we��ll need the current Enter current password for root (enter for none): Setting the root password ensures that nobody can log into the MySQL Set root password? [Y/n] <�C ��܇ By default, a MySQL installation has an anonymous user, allowing anyone Remove anonymous users? [Y/n] <�C ��܇ Normally, root should only be allowed to connect from ��localhost��. This Disallow root login remotely? [Y/n] <�C��܇ By default, MySQL comes with a database named ��test�� that anyone can Remove test database and access to it? [Y/n] <�C ��܇ Reloading the privilege tables will ensure that all changes made so far Reload privilege tables now? [Y/n] <�C ��܇ Cleaning up�� All done! If you��ve completed all of the above steps, your MySQL Thanks for using MySQL! [root@server1 ~]# |
| ��yum install httpd |
��������ϵ�y���ӕr�Ԅӆ���apache
| ��chkconfig --levels 235 httpd on |
�����؆�apache:
| ��/etc/init.d/httpd start |
���������Ğg�[��ֱ��http://192.168.0.100���㑪ԓ����apache2����棺

������CentOS��Apache��Ĭ�J�ęn�ĸ�Ŀ���/var/www/html�������ļ�/etc/httpd/conf/httpd.conf���������ô惦��/etc/httpd/conf.d/Ŀ�����
����4.Installing PHP5
�����҂������bPHP5��Apache PHP5ģ�K,�������£�
| ��yum install php |
�������b��ɺ���������Apache
| /etc/init.d/httpd restart |
����5.�yԇPHP5 /�@ȡPHP5���b��Ԕ����Ϣ
����Ĭ�J��Webվ�c���ęn��Ŀ�/var/www/html ���F�ڣ��҂�����ԓĿ��Є���PHP̽��ļ�((info.php)���ڞg�[�����{���� ��ԓ�ļ����@ʾ�ܶ����õļ����������҂����b��phpģ�K���b�r����ɡ�
| vi /var/www/html/info.php |
�����F�ڣ��ڞg�[�����_(���ļ�http://192.168.0.100/info.php)��
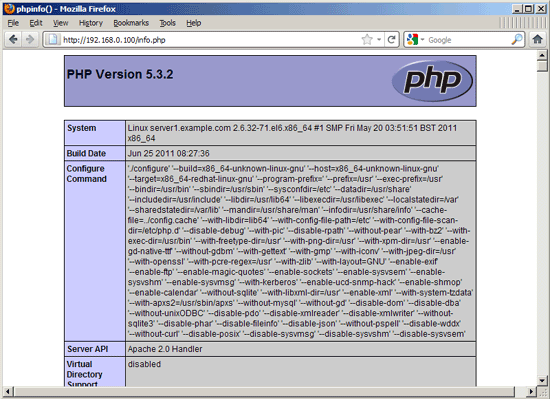
�����������������ģ�PHP5��������������^�m���L�ӣ��������������PHP5���ѽ����õ�ģ�K ���]��MySQL���@��ζ���҂�php5��߀�]��MySQL֧��ģ�K��
����6.��PHP5������MySQL֧��
| ����yum search php |
�������x��Щ����Ҫ��ģ�K�����b��
yum install php-mysql php-gd php-imap php-ldap php-mbstring php-odbc php-pear php-xml php-xmlrpc |
�����F��������Apache2
| ����/etc/init.d/httpd restart |
����7.���bphpMyAdmin���픵����
����phpMyAdmin��һ��Web���棬ͨ�^�����Թ������MySQL�����졣
�������ȣ��҂�ʹ�҂���CentOS ϵ�y��RPMForgeܛ����phpMyAdmin�Dz��ǹٷ���CentOS 6.0�죺
��������rpmforge��GPG��耣�
| ��rpm --import http://dag.wieers.com/rpm/packages/RPM-GPG-KEY.dag.txt |
����x86_64 ϵ�y���b����:
| ��yum install http://pkgs.repoforge.org/rpmforge-release/rpmforge-release-0.5.2-2.el6.rf.x86_64.rpm |
����i386 ϵ�y���b����:
| ��yum install http://pkgs.repoforge.org/rpmforge-release/rpmforge-release-0.5.2-2.el6.rf.i686.rpm |
�����F�ڿ����bphpMyAdmin���£�
| ��yum install phpmyadmin |
�����F�ڣ��҂�����phpMyAdmin����׃Apache�����ã�ʹphpMyAdmin�B�ӣ������H�H�Ǐ�localhost(עጵ����S) ��
vi /etc/httpd/conf.d/phpmyadmin.conf
|
������һ�����҂���׃��phpMyAdmin��������C cookie ��HTTP��
vi /usr/share/phpmyadmin/config.inc.php[...]/* Authentication type */ $cfg['Servers'][$i]['auth_type'] = ��http��; [...] |
����������Apache��
| ����/etc/init.d/httpd restart |
����֮�������Ը����L��phpMyAdmin http://192.168.0.100/phpmyadmin/���픵���죺
����8.���P朽�
����Apache: http://httpd.apache.org/
����PHP: http://www.php.net/
����MySQL: http://www.mysql.com/
����CentOS: http://www.centos.org/
����phpMyAdmin: http://www.phpmyadmin.net/
�P�I�֣�LAMP ��������������
������:
- CentOS7�D�����þW�j�ķ���
- CentOS 7������ӄh���Ñ�
- ��ν�Qcentos7�pϵ�y��Gʧwindows�����
- CentOS�ξW������������Ӳ�ͬIP��
- CentOS��iconv����Ľ�B
- Centos7 SSH��耵�ꑼ��ܴa����p����CԔ��
- CentOS 7.1���ӄh���Ñ��ķ���
- CentOS����/�������W��ӡ�CIP�v��
- CentOS7ʹ��hostapd���F�oAPģʽ��Ԕ��
- su������ГQroot�Ľ�Q����
- ��QVMware��CentOS7�W�j�؆����e
- ��QCentos7�pϵ�y��Gʧwindows�����
- CentOS����α����ļ����w
- CentOS7��CentOS6ϵ�y��ʲô��ͬ��
- Centos 6.6Ĭ�JiptableҎ�tԔ��